


Summary
Before your TentBox Cargo is ready to use, you need to first attach several parts to the TentBox Cargo, and then mount the TentBox Cargo to your car. All of the attachments fit directly to the accessory rails on the outside edges. This article explains this process in detail.
If you have any questions regarding the installation or use of your TentBox, please get in touch with our support team. Do not install your TentBox if you do not understand these instructions.
Key safety information
You must ensure that:
- You have purchased roof bars that: are made by a reputable manufacturer; are authorised for usage in conjunction with your vehicle; have been tested (e.g. GS-tested); and have an adequate load limit for the TentBox model you are installing.
- You have installed your roof bars safely and securely as per the manufacturer's instructions.
- Your TentBox is installed safely and securely as per our fitting instructions.
- Your TentBox is closed fully and securely with the closing buckles when driving.
- You regularly check that your roof bars are securely fixed to your vehicle as per the manufacturer's instructions and that none of the components are damaged.
- You regularly check that your TentBox is securely fixed to your roof bars and that none of the components are damaged.
- You never drive faster than 70mph when you have a TentBox installed on your car.
- You give due consideration to the change in your vehicle's drive behaviour when a TentBox is installed on your car, taking into account side-wind sensitivity and corner and breaking behaviour.
- You give due consideration to the change in your vehicle's height when a TentBox is installed on your car. The height of your vehicle can increase by up to 90cm (dependending on your roof bars), so beware of low entrances and low-hanging branches.
Video guide
Unboxing
Please be careful when unboxing your TentBox, and take extra care with children around. It's a large and heavy product, with a number of moving parts and mechanisms that could cause injury if care isn't taken.
It's important to check your TentBox thoroughly when first opening them, to ensure any metal shards that may be present from the manufacturing process are removed before use. Although we clean these out before packaging the TentBox, in some cases more trapped shards can fall out during transit and the final delivery. Please make sure to double check and use a hoover to remove any more shards you do find.
Assembly
The order of the following assembly instructions will depend on your personal preferences for using the TentBox Cargo, as the parts all use the same accessory rails. Your TentBox, your way!
Attaching the handle to your TentBox Cargo
You can attach the handle wherever you like, it helps to pull the TentBox closed when buckling it up.
- Using the small bolts, in combination with the small metal plates, you can slide the handle along the top accessory rail, on any part of your TentBox.
- Tighten it securely in place, using the allen keys provided.

Attaching the closing buckles to your TentBox Cargo
You will need to attach both the closing buckle itself as well as the latch that the buckle attaches to.
- Using the small bolts, in combination with the small metal plates, you can slide the latch along the top accessory rail, and tighten it in place using the allen keys provided.
- Do the same thing with the buckle, but along the bottom accessory rail. Make sure to line it up with the latch which you attached in step 1.
- Do the same thing with your other latch and buckle, so that you have two functioning closing buckles.
- Ensure you tighten these bolts securely using the allen key provided.

Attaching the ladder receivers to your TentBox Cargo
The ladder receivers can be positioned at either side, or the rear, depending on how you want to use your TentBox.
- Using the small bolts, in combination with the small metal plates, you can slide the ladder receivers along the bottom accessory rail, and tighten them in place using the allen keys provided.
- Make sure you set the latches the correct distance apart, by testing it with the ladder.
- Tighten the bolts securely using the provided allen key.

Attaching the pole bases to your TentBox Cargo
The pole bases are the metal components into which your porch poles slot into.
- Using the small bolts, in combination with the small metal plates, you can slide the pole bases along the bottom accessory rail, on the rear side of your TentBox (the side that opens up).
- Ensure they are in the correct place, with the angle of the holes facing outwards, towards the edges of the TentBox. You can test it using the tent poles, before securing them tightly with the allen keys provided.

Attaching the crossbars to your TentBox Cargo
Available for purchase separately, the Cargo Roof Bars install to the top of your TentBox Cargo and are a great addition for carrying bikes, kayaks and more!
- Fix one crossbar mounting bracket to each end of the two crossbars, using the small bolts provided, and the small metal plates which are inside the bar itself.
- Adjust the brackets on the bars, so they are the correct distance apart to fit snugly over the top of your TentBox.
- Using the small bolts, in combination with the small metal plates, you can slide the crossbar brackets along the top accessory rail of your TentBox, and tighten them in place.

It is very important to make sure these are very tight, as they will experience a lot of resistance when driving.
Mounting to your vehicle
You must ensure that the fixing clamps are adequately tightened, so that your TentBox is securely fixed to your roof bars.
The friction of the fixing clamps against your roof bars holds your TentBox securely to your car, so you must make sure the nuts are adequately tightened to prevent any movement.
We recommend that you give the TentBox a hard shove in each direction, especially from the front and back in the direction of the fixing rails, to ensure there is no movement.
- With the help of at least one other person, carefully lift your TentBox onto your roof bars and position centrally.
- Clamp the TentBox to your roof bars at 4 points using the fixing clamps provided:
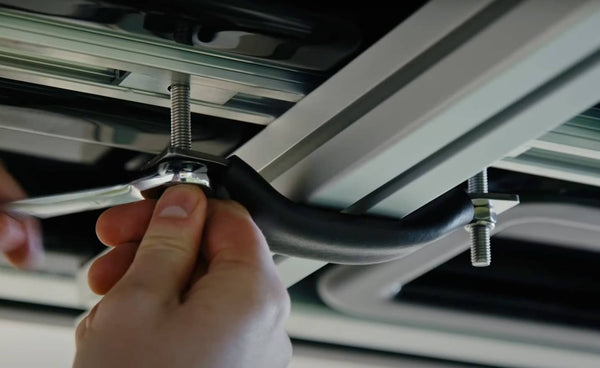
- First, drop a bolt through one of the small metal fixing plates and slide the plate along the rail on the underside of the TentBox, so that the thread of the bolt drops down next to your roof bar.
- Repeat the previous step until you have two bolts dropping down on either side of each roof at each of the four clamping points.
- Using the nuts provided, tighten one of the U-shaped fixing clamps onto two of the hanging bolts until it is securely fastened to your roof bar. Repeat this step for all four clamping points. You must ensure that the nuts are adequately tightened, and that the fixing clamps are securely fastened against your roof bars at all four clamping points.

In order to avoid generating excessive lifting forces, your TentBox should be mounted parallel to the line of the road and not at an angle.
Using your TentBox
Opening your TentBox Cargo
- Unbuckle your TentBox, and push up from the rear. The gas struts will do the rest.
- Insert the tent poles into the pole bases, and prop open the porch that covers the rear door.
If you have weight on top of the TentBox, you might need to manually push the TentBox up, as the gas-struts can’t do it alone. Once it’s in the fully open position, it will stay open, as long as you don’t have too much weight on top.
Using your ladder
- Place the ladder into the ladder receiver and ensure the receiver pins are securely fastened.
- Pull the ladder outwards to extend it.
- Push the black buttons inwards to collapse it.

- Please be careful of your fingers as the ladder can drop suddenly.
- Do not let children use the ladder while unsupervised.
- Ensure the ladder is as vertical as possible for your vehicle's height.
Closing your TentBox Cargo
- Remove the porch poles and the ladder.
- Pull the elastic cord up to keep the fabric tucked in.
- Using the closing strap and handle, pull your TentBox closed.
- Apply the closing buckles and ensure they are securely fastened before driving.

